Die ersten Schritte im Spiel
From FragoriaWiki
Heidenlaerm (Talk | contribs) |
Heidenlaerm (Talk | contribs) |
||
| Line 1: | Line 1: | ||
| - | == | + | == The Village of Navy == |
| - | + | After [[Character Creation|character creation]] you will get to meet the tutorial civilians. When you talk to them, you may recieve ''quests'' that, after finished, will give you useful rewards. | |
| - | [[ | + | [[File:Village of Navy.jpg|600px]] |
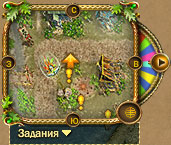
| - | * ''' | + | *'''If a civilian wants to talk to you to give you a quest''', above his head is an icon - a yellow exclamation mark (like this [[File: Faq 023.jpg]]). The other icons over the heads of civilians, can be found in the section [[Civilians]]. The same icons will be marked on the ''minimap'' on the top left corner of the screen and in the world ''map''. |
| - | [[File: | + | [[File:Faq 098.jpg]] |
| + | | ||
| + | *To talk to [[Civilians | civilians ]],''' you need to approach him/her and double-click with the left mouse button. | ||
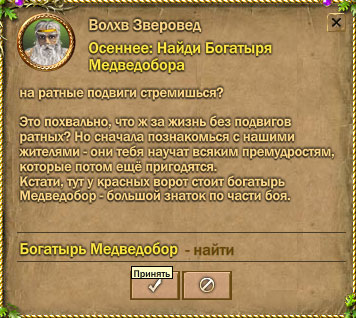
| + | *In the window where the quests are listed, you'll see a text description of the assignment and it's rewards. | ||
| + | *'''To accept the quest''' you need to press the button ''Accept'' at the bottom of the dialogue window. More information about tasks can be found in [[Assignments]]. | ||
| - | + | [[File:Faq 175.jpg]] | |
| - | + | ||
| - | + | ||
| - | [[ | + | The quests in this village will help you learn the basics of''[[Fighting in the game | battle'']], conversations with local residents, ''[[Trade |trading]]'', ''transitions'' between locations and various types of quests. |
| + | After completing the quests in the village, your character is assigned to find the Muromian Counselor and can move on to the next stage of the game. | ||
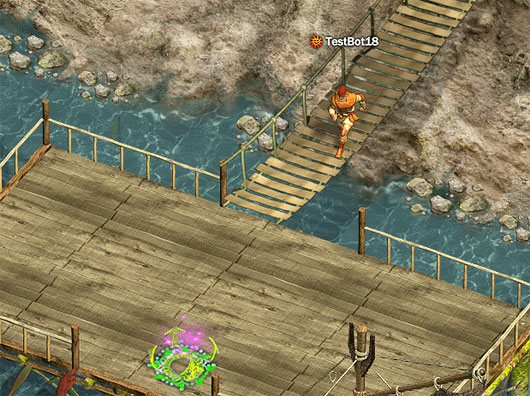
| - | + | *'''To get to Murom''' you have to walk on the boardwalk that starts near the place where the ferryman is found and pass through a portal on the dock. | |
| - | + | ||
| - | + | [[File:Faq 176s.jpg]] | |
| - | + | == Murom == | |
| - | + | After travelling, the character arrives on the pier of Murom. | |
| - | + | *'''To find the Muromian Counselor''', just open the map [[File: Faq 057.jpg]], it will be marked with a yellow question mark (like this [[File: Faq 024.jpg]]). | |
| - | + | In Murom, you'll be familiar with the basics of ''[[Pets | pet ]]'' control and ''item upgrade''. | |
| - | + | == Movement == | |
| - | + | '''To move the character around''', click anyhere on the field. | |
| - | + | == Portals == | |
| - | + | The entrances to the houses and the transitions between locations of the game are marked with a pink glow. If you hover your mouse over the glow, you'll see animated yellow arrows, which indicate that you may enter the area. The map transitions are also marked with a pink icon [[File: Faq 029.jpg]] | |
| - | + | *'''To go through the portals''' you need to get closer and click on it. | |
| - | + | == Minimap == | |
| - | + | In the upper left corner of the screen is the minimap. It marks the location of the character and various game objects. | |
| - | + | *'''Location and the direction the character is facing''' are marked as follows: [[File: Faq_022.jpg]]. | |
| + | *'''NPCs, giving quests''' are indicated as follows: [[File: Faq_023.jpg]]. More information about the quests can be found in the section [[Assignments]]. | ||
| + | *'''Portals to other locations''' are indicated as follows: [[File: Faq 029.jpg]] | ||
| + | *'''Another character, who is in your party''' looks like [[File: Faq 030.jpg]]. More information about parties can be found in [[Groups]]. | ||
| - | + | In the corner of the minimap there is a button [[File: Faq 021.jpg]], clicking on it will display the whole region map. The icons on it are the same as the ones on the minimap, but you can see a much larger area. You can also see in the upper part of the map, the coordinates of the character. | |
| - | + | ||
| - | + | ||
| - | + | ||
| - | + | == See also == | |
| - | + | * [[Teleport scrolls]] | |
| - | == | + | * [[Death and resurrection]] |
| - | * [[ | + | * [[Backpack]] |
| - | * [[ | + | [[Category:Instructions]] |
| - | * [[ | + | |
| - | [[Category: | + | |
Revision as of 17:48, 12 June 2010
Contents |
The Village of Navy
After character creation you will get to meet the tutorial civilians. When you talk to them, you may recieve quests that, after finished, will give you useful rewards.
- If a civilian wants to talk to you to give you a quest, above his head is an icon - a yellow exclamation mark (like this
 ). The other icons over the heads of civilians, can be found in the section Civilians. The same icons will be marked on the minimap on the top left corner of the screen and in the world map.
- To talk to civilians , you need to approach him/her and double-click with the left mouse button.
- In the window where the quests are listed, you'll see a text description of the assignment and it's rewards.
- To accept the quest you need to press the button Accept at the bottom of the dialogue window. More information about tasks can be found in Assignments.
The quests in this village will help you learn the basics of battle, conversations with local residents, trading, transitions between locations and various types of quests. After completing the quests in the village, your character is assigned to find the Muromian Counselor and can move on to the next stage of the game.
- To get to Murom you have to walk on the boardwalk that starts near the place where the ferryman is found and pass through a portal on the dock.
Murom
After travelling, the character arrives on the pier of Murom.
- To find the Muromian Counselor, just open the map
 , it will be marked with a yellow question mark (like this
  ).
).
In Murom, you'll be familiar with the basics of pet control and item upgrade.
Movement
To move the character around, click anyhere on the field.
Portals
The entrances to the houses and the transitions between locations of the game are marked with a pink glow. If you hover your mouse over the glow, you'll see animated yellow arrows, which indicate that you may enter the area. The map transitions are also marked with a pink icon ![]()
- To go through the portals you need to get closer and click on it.
Minimap
In the upper left corner of the screen is the minimap. It marks the location of the character and various game objects.
- Location and the direction the character is facing are marked as follows:
 .
.
- NPCs, giving quests are indicated as follows:
 . More information about the quests can be found in the section Assignments.
- Portals to other locations are indicated as follows:

- Another character, who is in your party looks like
 . More information about parties can be found in Groups.
In the corner of the minimap there is a button ![]() , clicking on it will display the whole region map. The icons on it are the same as the ones on the minimap, but you can see a much larger area. You can also see in the upper part of the map, the coordinates of the character.
, clicking on it will display the whole region map. The icons on it are the same as the ones on the minimap, but you can see a much larger area. You can also see in the upper part of the map, the coordinates of the character.


